Showing posts with label Martha Monday. Show all posts

Monday, August 8, 2011

Martha Monday - tissue paper pom poms

hello. i haven't been keeping up with my "weekly" posts very well. not too many Martha Mondays. Sorry Martha, i don't relate to you sometimes... as u'll see displayed on my instagram feed
this was my kitchen sink last Friday. no bueno.
Martha would be so ashamed.
but i also haven't been posting my Sunday Read Alongs. i've been reading, taking notes, just not blogging it. 
my bad. forgive me. i'll TRY to do better.
so lets get back to Martha!
the first time i saw these was in a kit by Martha at Michael's i think.


{images via pinterest "tissue paper pom pom" search}
then tiffany used them for my baby shower for Isabella. 

and katlyn had some at her last birthday party.


i love them. i think i'll make some for isabella's room.

here's the how to! straight from Martha.
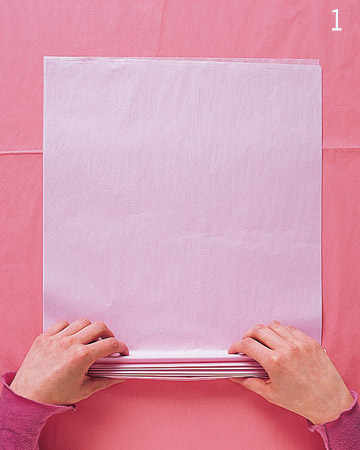

{marthastewart.com}
stack 8 20X30 inch sheets of tissue. make 1 1/2 inch wide accordion folds, creasing with each fold.


{marthastewart.com}
"fold and 18 inch piece of floral wire, {or any kind of wire} in half, and slip over center of folded tissue; twist. with scissors, trim end of tissue into rounded or pointy shapes." in the picture above the smaller pom pom is cut pointy, & the bigger one is rounded. you could cut slits in the ends like fraying almost too! that would be cute!

{marthastewart.com}
"separate layers, pulling away from center one at a time"
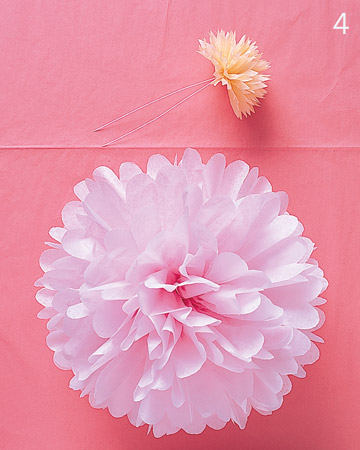
{marthastewart.com}
"twist wire to secure!"


BUT!! there are so many variations. the fringe effect like i mentioned above, less tissue paper sheets would give them an airier look, i wouldn't recommend using more than 8 or 9. you can buy a package of about 9 sheets at Target or Wal-mart for about $1. and think of all the prints! polka dot, striped! mixing colors! make red & green ones for christmas! what about 4th of July ones?! what's even better is you can fold them back up and store them to use them as long as they'll hold up! 

i found these on pinterest too! think of all the possibilities.

{images via pinterest "tissue paper pom pom" search}

i even made a fringe one like the one i mentioned earlier that i thought would be pretty.
cute huh?!

i used a ribbon instead of wire. though wire would be good so you can just measure the length of your string, ribbon, yarn, whatever you use when hanging your pom pom. also, i would recommend not fluffing them until the day of, or until you're ready to hang them. they are easier to transfer that way too {for a party at a different location}

however you choose to use them, whatever color, size, or print you choose to use for them, i promise you'll love the way they look!


Monday, July 18, 2011

Martha Monday {painting vertical stripes}

so, Martha Stewart didn't have much to say about painting vertical stripes.
at least not that i found.


so, hi! i'm emma & i painted these beautiful walls almost all by myself!
{my brother helped... a little}


so instead of a Martha Stewart info column {see hereherehere, here, here, & here}
i'll be the one giving the tips!


so, here are my tips for painting vertical stripes.


tip # 1- always start with the lighter color first!
First paint a base coat on the entire wall. for stripes that's really important because the base coat will be one of the stripes


tip #2- measure TWICE paint once.
from sewing i've learned that you measure twice, cut once. instead of ruining your work, your fabric, the whole thing. i would suggest {& so would the rest of the "experts" online} that Stripes should be between 4" and 12" wide. {A width of less than 4" would be too narrow and busy; more than 12", too wide and heavy} my stripes as 4 & 8 inches wide. measure from the corner least seen out. i used a pencil to mark my lines. I think a laser level would've been ideal for this! if i had one.


tip #3- mark the stripes you're NOT going to paint!
mark them with an x, or as i did in the picture below, with a diagonal strip of tape. you might get in the painting groove & paint a spot that you weren't supposed to.
{mathew & billy thought i was going to paint diagonal lines on those. silly boys}


tip #4- paint your edges FIRST!!


tip #5- be patient with the tape.
it'll tear your base color off if you don't wait 48 hours before even thinking of measuring & taping your stripes. trust me! 


and last but most important!

tip #6- know what you're up against.
48 hours for base coat to dry. if you need to primer before that you'll need to make sure that dries. then dry time for the stripes. cleaning your walls before you even begin. this is at least a 4 or 5 day process. not 2 like initially thought. & that's not counting the 3 layers of wall paper & boarder I had to remove. also look up "painting vertical stripes" on youtube. there are some great videos by Home Depot!

 love my stripes, though it was kind of a pain to do because i didn't know tip #6 & didn't know there were 3 layers of wallpaper. i'm still glad that i followed through, did it right & got the kitchen paint i wanted!