Showing posts with label parties. Show all posts

Thursday, March 28, 2013

Oreo Pops

I told y'all I'd share a how-to on the Oreo pops I made for D's MJ birthday party... a few months later, I finally got around to it.

So I found this via Pinterest.

{this picture via}

Oreo Pops! Genius.

I didn't click on it. I just thought, "duh! I can do that!"


Nope.

I figured out real quick that they're not as easy as they look at first glance. I went back and found the pin, but the link didn't have a step by step. I decided to take matters into my own hands. If there is another tut out there, I'm not sure. I just decided to figure it out.

Here's the quick how to: {emma style}

make room for the stick. Just scoop out some of the cream filling and... set it aside.. or eat it. Go ahead. Eat it. You know you want to. Don't waste it.


Melt a few candy melts at a time in a small bowl. I forgot to take a picture of the candy melts that I used. But you can find them here or pick them up at Hobby Lobby, Michael's, or even Walmart. Melt them {*HINT: if you over do it in the microwave and the melted candy becomes thick and just isn't working, add a little bit of coconut oil or shortening to smooth it back out.*}

Grab a stick that hasn't been licked clean {I got mine at the cake/wedding section at Walmart} and dip the lollipop stick in the melted candy.


Spread it around a bit. This will act as a glue to keep you Oreo on the stick. 


Place the other cookie part on top.


If you don't know your own strength like me I guess, they may crack.


No biggie. They'll be covered soon. Place them on a cookie sheet covered with wax paper


Now that all of those are on sticks you can melt the rest of the candy melts, or just a few more. Whatever you feel. Go with your gut. Follow your heart... Do whatever is easiest.


I used a spoon to cover the cookies with melted candy melts. AGAIN, don't try and make them so absolutely perfect. It's impossible. And they'll be eaten in an instant, no one will be inspecting them...  At least I wouldn't think so.

If you want them just white {or whatever color candy melt you got} and don't mind a flat side you can just put them right back on the wax paper, Or use one of these inexpensive cake pop stand things I also found at Walmart. {what can I say? Walmart is a necessary evil.}


If you want to add sprinkles you'll have to do it right after you cover the Oreo with the melted candy melts over a bowl before it dries. ONE AT A TIME. Just pour them on. Half dipped in sprinkles would look fab too!

And that's it. A little more time consuming than I assumed at first, but not to bad. You can also make them a couple of days ahead of time, just keep them covered.

Enjoy! And let me know if you make them or you come up with any new variations to try. I would also LOVE to see pictures. {email me here.}


Monday, November 28, 2011

Super Douglas

Douglas had a small birthday party yesterday. He turned 4! 4! I can't believe it! [read his birth story here] He's way into superheros right now so what better than a superhero party?! Here are some of the highlights! 


each guest got a goody bag & balloon along with a custom superhero cape. They also got to decorate their own superhero mask! 


My "fan favorite" chocolate cupcakes with cream cheese icing were a hit. Justice's cupcake eating is my favorite! [bottom left]


Douglas loved ALL his presents. At one point he even exclaimed "BATTERIES!" lol


A few weeks ago Mathew & Billy went out & found him a 3/4 guitar. His reaction says it all.


I think everyone had a good time. Even though in the last couple of weeks time just got away from me & I didn't invite as many people as I wanted to.


But at the end of the the day, this "Wonder Woman" was spent. pooped. exhausted.


Monday, August 8, 2011

Martha Monday - tissue paper pom poms

hello. i haven't been keeping up with my "weekly" posts very well. not too many Martha Mondays. Sorry Martha, i don't relate to you sometimes... as u'll see displayed on my instagram feed
this was my kitchen sink last Friday. no bueno.
Martha would be so ashamed.
but i also haven't been posting my Sunday Read Alongs. i've been reading, taking notes, just not blogging it. 
my bad. forgive me. i'll TRY to do better.
so lets get back to Martha!
the first time i saw these was in a kit by Martha at Michael's i think.


{images via pinterest "tissue paper pom pom" search}
then tiffany used them for my baby shower for Isabella. 

and katlyn had some at her last birthday party.


i love them. i think i'll make some for isabella's room.

here's the how to! straight from Martha.


{marthastewart.com}
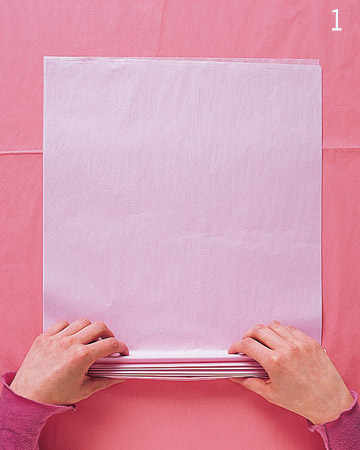
stack 8 20X30 inch sheets of tissue. make 1 1/2 inch wide accordion folds, creasing with each fold.


{marthastewart.com}
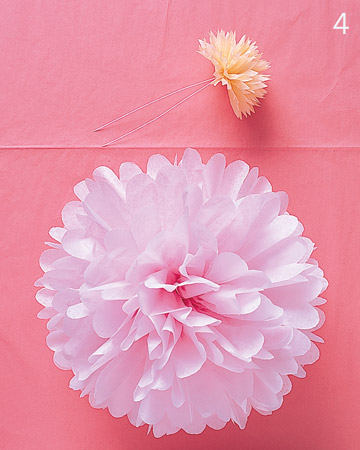
"fold and 18 inch piece of floral wire, {or any kind of wire} in half, and slip over center of folded tissue; twist. with scissors, trim end of tissue into rounded or pointy shapes." in the picture above the smaller pom pom is cut pointy, & the bigger one is rounded. you could cut slits in the ends like fraying almost too! that would be cute!

{marthastewart.com}
"separate layers, pulling away from center one at a time"

{marthastewart.com}
"twist wire to secure!"


BUT!! there are so many variations. the fringe effect like i mentioned above, less tissue paper sheets would give them an airier look, i wouldn't recommend using more than 8 or 9. you can buy a package of about 9 sheets at Target or Wal-mart for about $1. and think of all the prints! polka dot, striped! mixing colors! make red & green ones for christmas! what about 4th of July ones?! what's even better is you can fold them back up and store them to use them as long as they'll hold up! 

i found these on pinterest too! think of all the possibilities.

{images via pinterest "tissue paper pom pom" search}

i even made a fringe one like the one i mentioned earlier that i thought would be pretty.
cute huh?!

i used a ribbon instead of wire. though wire would be good so you can just measure the length of your string, ribbon, yarn, whatever you use when hanging your pom pom. also, i would recommend not fluffing them until the day of, or until you're ready to hang them. they are easier to transfer that way too {for a party at a different location}

however you choose to use them, whatever color, size, or print you choose to use for them, i promise you'll love the way they look!


Friday, July 15, 2011

summer party

my katlyn is growing up:


she came over about 2 weeks ago to drop some stuff off & i asked her what she was doing for her birthday.

"i don't know yet. i know i wan't to have a party, maybe at tiffany's house"

our friend tiffany & her husband just bought a house. one that came with a shop, a deck, a hot tub, 2 fish ponds, a gazebo & a pool. whew! sounds beautiful, but like a lot of work. as much as i'd love something like that i know it would be full of weeds & practically be ruined if i had to take care of it. i can barely keep up with the inside of my house, in fact i don't do that great of a job. tiffany though, she's awesome at stuff like that so she keeps it looking great!

the invitation read that the party would be held "in Tiffany's gazebo"
the guests saw this when they arrived. 


candles lined the path to the gazebo
my first attempt at making bunting! i think it turned out pretty good! :)
doesn't it look lovely?!


pompoms, flag bunting, tulle, the works!

not to mention great food, which i forgot to take a picture of until my plate was pretty much empty

but believe me! it was yummy!

i think everyone enjoyed themselves. 
i know i did.

this is Tracy & Elizabeth, Katlyn's mom & 1 of her sisters. they told me not to get weird or funny pictures of them.


what?! i'm sorry i didn't hear that!


we even got a couple of group shots!


& we each got 1 with the birthday girl!


i had to leave before pretty much anyone else. motherhood. kids with allergies. you know.
but before i left, the sun started setting & the party venue looked a little something like this


one of the prettiest parties, ever.

happy birthday Katlyn! love you!